Previously, I wrote about how bending down towards the floor is commonly used during daily movement and somehow mistakenly has also been utilized as a self-stretch. Hopefully the last article I wrote helped you appreciate how, when done repeatedly, bending down towards your toes can lead to lumbar symptoms. (You can find that article : here). I offered a suggestion regarding how performing a hip hinge is an appropriate substitute for bending through your back, and also mentioned how there are more safe ways to stretch as well. Below, I am going to describe the hip hinge and how to correctly perform the movement. As for the previous comment about more safe ways to stretch, more on that later.
I like the hip hinge for several reasons. The hip hinge is purely a sagittal plane movement through the hip joint which helps engage the posterior chain (glutes and hamstrings), which often is weaker due to anterior chain dominance (i.e. quads). Best and perhaps most importantly of all, the movement spares the spine and prepares you for several activities of daily living and is a good precursor/injury prevention tool for more athletic movements. We already know that the typical low back patient moves excessively through their low back during daily activities; but learning how to hip hinge effectively is a movement pattern that can assist the cervical spine patient who looks down too often, the anterior knee pain patient with inhibited glutes and hamstrings, and our elderly patients who need help transitioning from sit-to-stand.
Physical therapists and patients alike will tell you, learning how to correctly perform a hip hinge and then incorporating it into daily activities is easier said then done. Because most people have already trained their body to move a certain way, often times re-programming to move a different way, even though it’s more beneficial, is a foreign concept.
I have found that the most effective way to coach this movement is with the proprioceptive input gained from using a dowel rod. Having the dowel to help learn the movement provides the patient with the neural feedback to assess the movement and be more aware of inconsistencies when practicing correct form.
Here are the coaching tools I use to teach the hip hinge:
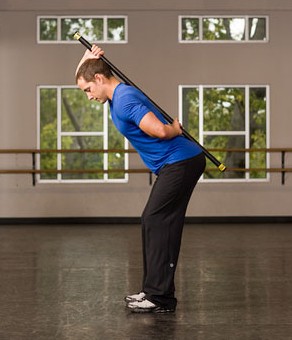 Step 1: Utilize the stick to create 3 points of contact: 1)Occiput, 2)Thoracic Spine, 3)Sacrum
Step 2: Keep a slight bend in the knees with feet slightly wider than shoulder width apart
Step 3: Engage your transverse abdominis and gluteal region (teaching points on how to do these actions will have already been instructed)
Step 4: Hinge forward—push butt back and keep chest up
The spine should remain neutral throughout the entire movement and the knee should not bend excessively either.


 ASTYM—The theories regarding mechanisms of action for Astym® treatment were developed based on the foundation of recent histologic research identifying the primarily degenerative nature of tendinopathies, and the investigations into the use of cellular mediators, growth factors and related products to assist in the healing and regeneration of tissues. ASTYM utilizes a series of specific movements with instruments that are run firmly along the skin following the direction of the muscle, tendon, or ligament with the goal of removing unwanted scar tissue and regenerating healthy tissue. A recent study at the American Society for Surgery of the Hand’s annual meeting showed that Astym treatment was an effective tennis elbow treatment by resolving 78.3% of chronic lateral epicondylitis (tennis elbow) cases.


 . According to Stuart McGill, who is an expert on low back disorders, the Superman exercise creates nearly 6000 N of compression to a hyperextended spine, transfers the load to your facets, and crushes the interspinous ligaments (You can see all his work in his book: Low Back Disorders: Prevention and Rehabilitation). Simply put, it’s really bad for your back when done repeatedly. For perspective, the National Institute for Occupational Safety and Health (NIOSH) did research and testing regarding the maximum disc compression levels that your back can safely tolerate. They found that level to be 3425 N, or about 770 pounds of force.

 1) Pectoral flys: When AC joint pathology is suspected, PTs perform a horizontal adduction test in order to provoke symptoms. Pain when moving the arm across the body (horizontal adduction) is indicative of a positive test. The pec fly exercise replicates the horizontal adduction test and should be avoided to prevent further damage.
 2) Overhead press: The closed pack position of a joint is the the point at which the joint surfaces are maximally congruent, and the ligaments are most pulled taut (i.e. less space in the joint for smooth movement). The closed pack position for the AC joint is 90 degrees of shoulder abduction. The closed pack position of the glenohumeral (GH) joint is 90 degrees abduction and external rotation, or maximum abduction and external rotation depending on the source. Overhead press can lead to shearing between the lateral end of the clavicle and the medial aspect of the acromion. It also takes the shoulder through ranges of the closed pack position repeatedly. We also know that the articular disc of the AC joint is already susceptible to age related degenerative changes which can lead to AC joint arthrosis, even without a pre-existing injury.

 icep dips apply additional, unwanted pressure to the anterior capsule of the shoulder. This can lead to anterior instability and laxity of the anterior capsule, which is the most common direction of instability of the shoulder. During the triceps dip, similar forces occur as with the example given above when my patient was trying to push his arm up to make the step deformity look better. There are safer ways to strengthen!